

Is it safe to use the videoconferencing app Zoom? Yes — if you know how to set it up properly.
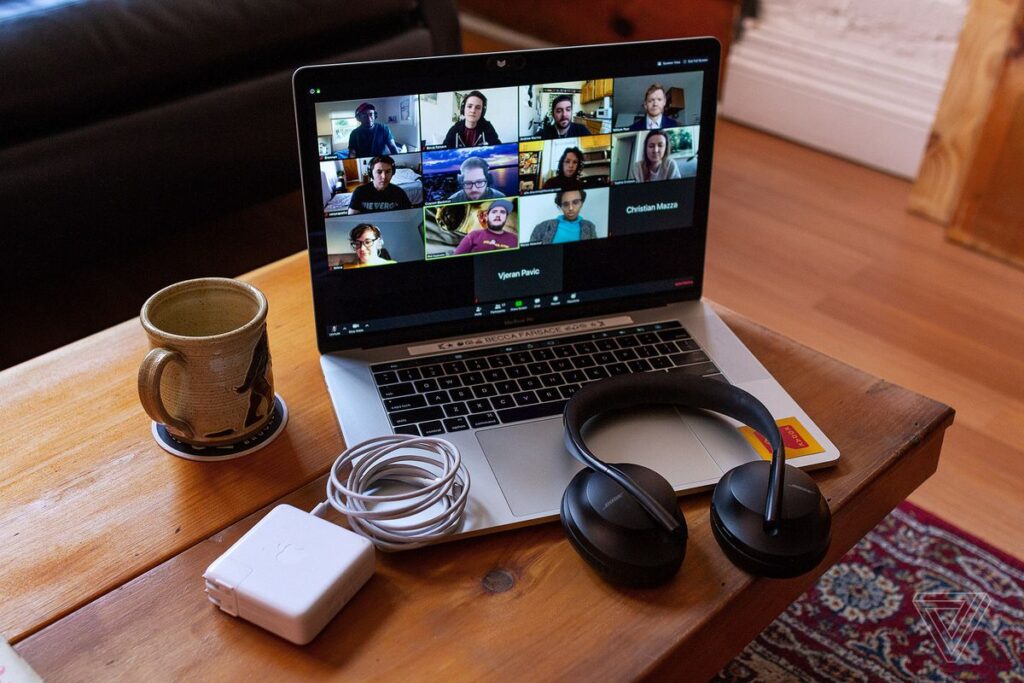
First, some background. As you may know, Zoom’s popularity has soared over the past couple of months as people stuck at home use its free version to stay in touch with friends, family, and co-workers. But while Zoom already included some methods that could be used to safeguard meetings, those features could be hard to find, especially if you hadn’t used the app before. Because of this, meetings began to be interrupted by unwanted intruders who would purposely cause disruptions, often in extremely nasty ways.
Not surprisingly, this led to a considerable backlash, much of it concerning the lack of security for users. In response, the company has put additional security measures in place. For example, it’s automatically enabling virtual waiting rooms and passwords for accounts in its free and lowest-paid tiers.
Having to deal with passwords and virtual waiting rooms may make for a slightly less friendly interface, but it also means that it’s less likely somebody you don’t know will pop into your family get-together. So if you’re using the free version of Zoom, here are some ways to keep your meetings secure.
Use a unique meeting ID and password
Zoom is now automatically adding passwords to accounts, and those passwords can be embedded in the links to people’s personal rooms. For example, if you go to your Zoom profile and look for your “instant meeting” link, you’ll see it contains both your personal meeting ID and, right after that, the password for the meeting. Anyone you send that link to will be able to immediately gain access to your meeting without having to separately post a password. Of course, posting that link publicly will negate any security the password might have provided.
So if you’re creating a meeting for more than a couple of friends, it’s probably a good idea not to use your usual meeting ID and to generate a separate password instead. To do that using the web interface:
- From the main Zoom page, click on “My Account” in the upper-right corner, and then click “Schedule a meeting”
- If you wish, you can enter a meeting topic and description. Put in the date, time, and duration of your meeting. (If you’re on the free plan, you’ve got 40 minutes.)
- Look for “Meeting ID,” and select “Generate Automatically.” This will generate a unique ID for that meeting rather than use your usual meeting ID.
- Make sure “Require a password” is checked. Zoom will generate a random password, but you can also create your own.
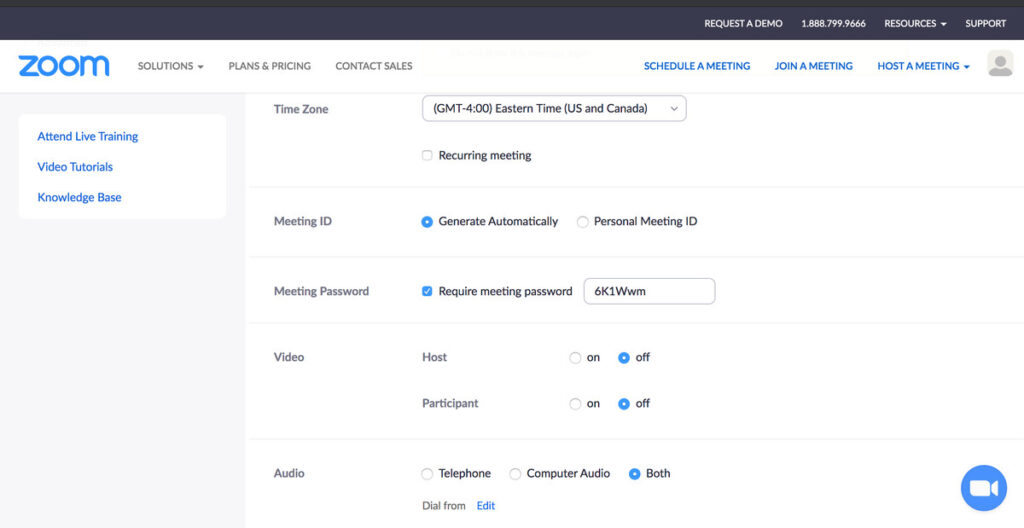
- Below that, make sure “Enable waiting room” is checked (and it’s a good idea not to check “Enable join before host” since that would let participants wander into the meeting before you do).
- Click on “Save”
- You’ll be brought to the meetings page where you will see all of the options for that meeting. Halfway down, you can click “Copy the invitation” to put all of the info into your buffer so you can send it to your participants. When you’re ready, click on the blue “Start this Meeting” button.
If you’re using the Zoom app:
- Click on “Schedule”
- You will be offered essentially the same selections as in the web app. If you want to make sure the waiting room is enabled, click on “Advanced Options” at the bottom of the page.
:no_upscale()/cdn.vox-cdn.com/uploads/chorus_asset/file/19908216/Zoom_safe_2.png)
- Click on the blue “Schedule” button
- You’ll be offered the chance to put the meeting into your calendar. After that, you’ll be brought back to the main window. The scheduled meeting will be on the right; if you want, you can click on the three dots to the right of your name to make changes or copy the invitation into buffer to send to your participants.
USE THE VIRTUAL WAITING ROOM
Of equal, or even more use, is the virtual waiting room. This lets you check out everyone before they actually gain access to the meeting. You can then either let them in — or not.
When each participant clicks on their link, they will be asked to wait, while you will get a notification telling you that someone has entered the waiting room. You can either immediately admit them or click on “See waiting room.”
:no_upscale()/cdn.vox-cdn.com/uploads/chorus_asset/file/19908286/zoom_safe_3.png)
A sidebar will then show you everyone who is waiting to enter the meeting; you can then either admit them, remove them from the waiting room (and from any chance to enter the meeting), or send them a message.
:no_upscale()/cdn.vox-cdn.com/uploads/chorus_asset/file/19908287/Zoom_safe_4_.png)
Having to approve everyone who wants to join might be a pain to deal with, especially if you’re expecting a lot of people, but it will ensure that anyone who shows up in your meeting actually belongs there.
LOCK DOWN, DON’T SHARE, KICK ‘EM OUT
There are other security features that you can take advantage of in order to protect yourself and the other participants.
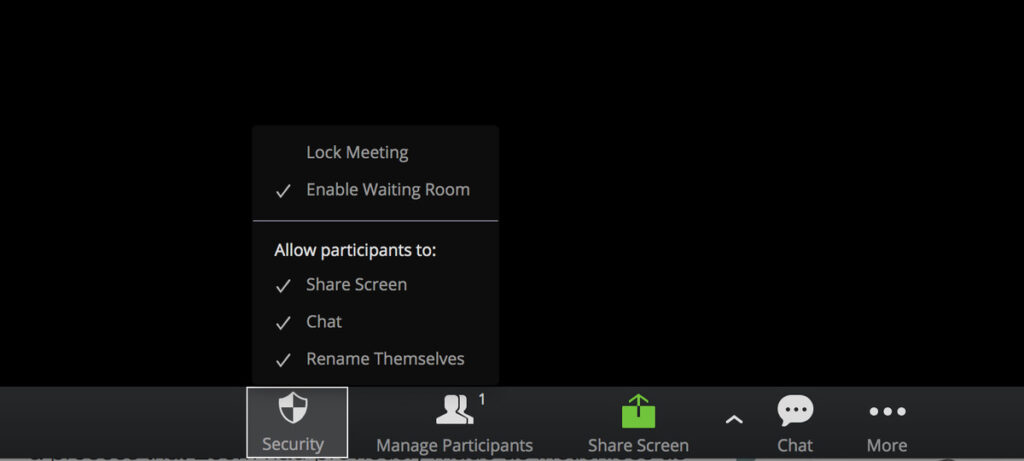
If you know exactly who belongs in your meeting, and they’re all there, you can lock down the meeting by clicking on the “Security” link at the bottom of the screen and choosing “Lock Meeting.” Once you do that, even somebody who has the meeting ID and password cannot get in.
:no_upscale()/cdn.vox-cdn.com/uploads/chorus_asset/file/19908305/zoom_safe_5.png)
Using the same menu, it could also be a good idea, especially if you’re holding a meeting with a lot of people, to uncheck the “Share Screen” selection. If by bad luck somebody who means to disrupt the meeting is allowed to share their screen, they can make things extremely uncomfortable for the rest of the participants. (If at some point, a participant has a legitimate need to share their screen, you can reenable sharing at any time.)
If a participant does start to misbehave but you don’t necessarily want to kick them out (or you want to discuss what you’re going to get them for their birthday), you can put them back in the waiting room. Click on the “Manage Participants” icon at the bottom of your screen, find the name of the participant on the resulting side panel, and then click on “More” > “Put in waiting room.” The participant will no longer have access to the meeting; in effect, they will be back in the waiting room until you decide to let them return.
:no_upscale()/cdn.vox-cdn.com/uploads/chorus_asset/file/19908309/zoom_safe_6.png)
Of course, you can kick somebody out of the meeting entirely by using that same drop-down menu and clicking on “Remove.” If that becomes necessary, by the way, it might be a good idea to then lock the meeting so they can’t try to get back in.